If you are dreaming about hiking in Torres del Paine National Park in Chile, you are in the right place. And, if you are feeling overwhelmed by the idea of planning it, you are also in the right place!
I recently went through the process myself and successfully planned the W Trek, a multi-day hike in Torres del Paine, without booking through a tour company. And I can tell you that it is 100% possible to do this on your own, and I want to tell you exactly how to do it!
What Is The W Trek?
The W Trek is a ~50-mile, multi-day hike (usually 4 or 5 days) in Torres del Paine that forms the shape of a “W” on the map. Along the way, you visit the park’s three main valleys:
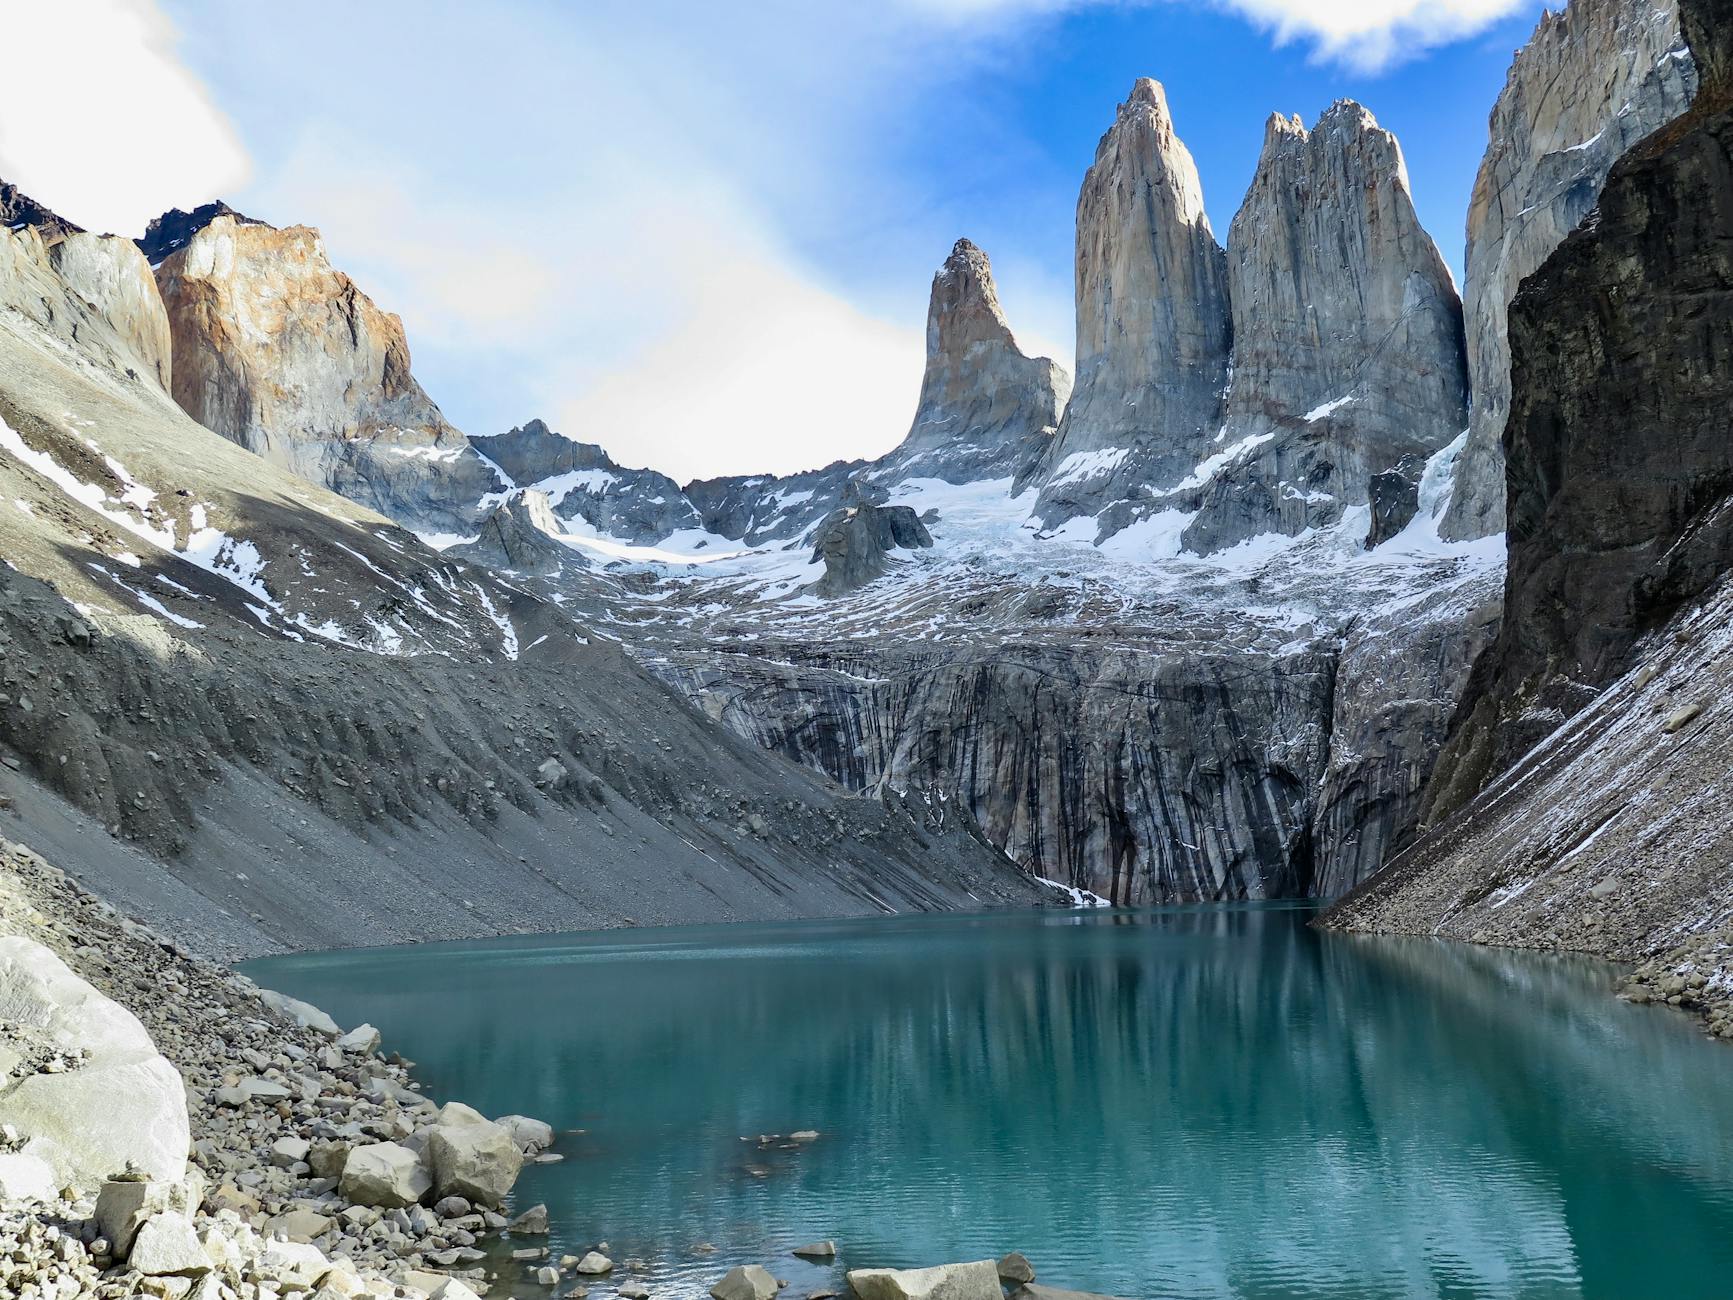
- The Towers (Torres Base): views of the iconic granite towers
- The French Valley: Panoramic mountain views and hanging glaciers
- Grey Glacier: Part of the massive Southern Patagonian Ice Field
Here is a W Trek Map to help you reference everything I mention in this blog:

When Should You Hike The W Trek?
The hiking season for Torres Del Paine is from October through April:
- December–February is the peak season and is the warmest, busiest, and most expensive
- October/November & March/April are cooler, fewer crowds, but more unpredictable weather
How Many Days Do You Need To Hike The W Trek?
The W Trek can be done in 3, 4, or 5 days.
The number of days you should do the W Trek depends on the time you have, your fitness level, and campsite availability.
Step 1: Decide Your Route
Which Direction Should You Hike The W-Trek?
You can hike the W Trek either east to west (starting at the Towers) or west to east (starting at Glacier Grey). Both are great options, and campsite availability will most likely decide for you. But, if you do have a choice, here is a breakdown to help you choose:
Hiking East to West (Towers First)
Pros:
- You start with the most famous viewpoint right away.
- You start with the toughest climb while your legs are fresh.
- Campsites are sometimes a little easier to book in this direction.
Cons:
- You finish the trek at Glacier Grey, which some find a less dramatic “ending” than the Towers.
Hiking West to East (Glacier Grey First)
Pros:
- Save the iconic Towers for your big finale, as it is the most famous viewpoint.
- You can time your Towers hike for sunrise, avoiding most of the day-hike crowds.
Cons:
- The hardest climb comes at the very end when you might be tired.
- Campsite availability can be more competitive in this direction.
My advice: If you can get the campsites, go from east to west. But if you end up hiking west to east, this is just fine, and you will still experience all the highlights of the W Trek, and the chance for a sunrise hike to the Towers is a pretty incredible perk.
Sample W Trek Itineraries
3-Day W Trek (Express Option)
This 3-day W trek option does not cover the full W trek (cuts out Glacier Grey), but is still a great option if you are limited on time or there is limited campsite availability.
East to West
- Day 1: Central → Mirador Torres del Paine → Chileno/Central (~10 miles)
- Day 2: Chileno/Central → Cuernos/Francés (~10 miles)
- Day 3: Cuernos/Francés → French Valley/Mirador Británico → Paine Grande (~12 miles)
West to East
- Day 1: Paine Grande → French Valley/Mirador Británico → Curenos/Francés (~12 miles)
- Day 2: Curenos/Francés → Chileno/Central (~10 miles)
- Day 3: Chileno/Central→ Mirador Torres del Paine → Central (~10 miles)
3-Day W Trek
This itinerary covers the entire W Trek in 3 days, but be ready for really long days. Personally, as a strong hiker, I would say this is not doable. I really would not recommend doing this route – go with the 3-day partial W Trek or the 4 or 5-day route.
East to West
- Day 1: Central → Mirador Torres del Paine → Chileno/Central (~10 miles)
- Day 2: Chileno/Central → Cuernos/Francés (~10 miles)
- Day 3: Cuernos/Francés → French Valley/Mirador Británico → Paine Grande → Grey → Paine Grande (~26 miles)
West to East
- Day 1: Paine Grande → Grey → Paine Grande (~14 miles)
- Day 2: Paine Grande → French Valley/Mirador Británico → Cuernos/Francés (~12 miles)
Day 3: Cuernos/Francés → Mirador Torres del Paine → Central (~20 miles)
4-Day W Trek
This is a great option for hikers who want the full W trek but are okay with a few longer hikes. This is my ideal option.
East to West
- Day 1: Central → Mirador Torres del Paine → Chileno/Central (~10 miles)
- Day 2: Chileno/Central → Cuernos/Francés (~10 miles)
- Day 3: Cuernos/Francés → French Valley/Mirador Británico → Paine Grande (~12 miles)
- Day 4: Paine Grande → Grey → Paine Grande (~14 miles)
West to East
- Day 1: Paine Grande → Grey → Paine Grande (~14 miles)
- Day 2: Paine Grande → French Valley/Mirador Británico → Cuernos/Francés (~12 miles)
Day 3: Cuernos/Francés → Central/Chileno (~10 miles) - Day 4: Chileno/Central → Mirador Torres del Paine → Central (~10 miles)
5-Day W Trek
This is the most popular option as the distances are more balanced.
East to West
- Day 1: Central → Mirador Torres del Paine → Chileno/Central (~10 miles)
- Day 2: Chileno/Central → Cuernos/Francés (~10 miles)
- Day 3: Cuernos/Francés → French Valley/Mirador Británico → Paine Grande (~12 miles)
- Day 4: Paine Grande → Grey (~7 miles)
- Day 5: Grey → Paine Grande (~7 miles)
West to East
- Day 1: Paine Grande → Grey (~7 miles)
- Day 2: Grey → Paine Grande (~7 miles)
- Day 3: Paine Grande → French Valley/Mirador Británico → Cuernos/Francés (~14 miles)
- Day 4: Cuernos/Francés → Chileno/Central (~10 miles)
- Day 5: Chileno/Central → Mirador Torres del Paine → Central (~10 miles)
Tip: Mileage will feel longer than expected due to super steep ascents, rocky terrain, and unpredictable weather. Always give yourself a buffer when planning daily distances.
Step 2: Book Your Accommodation
Booking accommodations is the trickiest part of planning the W Trek, and it is important to do this early!! This step might go hand-in-hand with Step 1, as the availability might determine your route.
Puerto Natales Accommodations
Before and after the W Trek, you will need to book accommodation in Puerto Natales, the gateway town to Torres del Paine. Spend at least one night before the trek to rest, rent any gear you might need, and catch an early bus into the park, and one night after the trek to shower and recover before traveling onward.
Most accommodations in Puerto Natales will hold your luggage for free while you are on the W Trek. This means you only need to bring your hiking gear into the park and can leave extra clothes, toiletries, and travel items behind.
Here are a few hotels in Puerto Natales that are good options:
Disclosure: This section contains affiliate links. If you click on one and make a purchase, I may receive a commission at no additional cost to you.
- Hotel Costaustralis
- El Patagónico Hostel
- Hotel Big Sur
- Hotel Aquaterra
- Hostal Boutique Factoria Patagonia
My budget pick is El Patagónico Hostel. I stayed in a private room here, and it is all you need for a night before and a night after the W Trek. It is a great place to chat with other travelers and get help with anything you might need from the staff.
Torres Del Paine Refugios and Campsites
All accommodations are managed by two different providers, which you will book through:
- Vertice Patagonia: Grey & Paine Grande
- Las Torres (formerly Fantástico Sur): Central, Chileno, Cuernos, Francés
My biggest tip is to check the availability on Torres Hike, then book directly through each operator. Torres Hike makes it so simple to see the dates each refugio is available and the types of sleeping arrangements/meals available for each.
Refugios & Campsites on the W Trek
- Central (East End – Base of the Towers)
- Chileno (Closest to the Towers)
- Cuernos (Near French Valley)
- Francés (Near French Valley, alternative to Cuernos)
- Paine Grande (West Side – Lake Pehoé)
- Grey (Closest to Glacier Grey)
Here’s the map again for reference!
Sleeping Options
Each refugio on the W trek has slightly different sleeping options, but generally they include:
- Campsites: Bring your own tent and gear to set up.
- Premium Campsites: A tent, sleeping bag, sleeping pad, and pillows are already set up for you.
- Refugio Dorms: Shared hostel-style bunk beds.
Campsites are cheaper, but carrying your own gear is tougher. I did premium campsites, which I would highly recommend, as they give you the camping experience without having to carry your own gear; the cost is much higher, though.
Meal Options
Each refugio on the W trek has slightly different meal options, but generally they include:
- Full Board: Breakfast, boxed lunch, and dinner.
- Half Board: Breakfast + dinner.
- À la Carte: Some refugios offer cafeteria-style meals or snacks for purchase.
Meals at the refugios are simple but get the job done. I did the half board (breakfast + dinner) at each, which was perfect. I recommend always booking dinner since a hot meal after a long hike is worth it. Breakfasts are basic (bread, jam, banana), and boxed lunches usually include a sandwich, fruit, and a granola bar. Depending on how many days you are doing the W trek, if you can fit snacks in your backpack (like protein bars, nuts, PB&Js), you may want to skip the boxed lunches and just eat what you bring. Each refugio also has food for purchase once you are there (pizzas, snacks, etc.).
Step 3: Book Your Transportation
Once you know the exact route you will be taking for the W trek, you can now book the transportation to get you there! You will need to plan for three stages of travel: getting to Chile, getting to Puerto Natales, and getting into/departing Torres del Paine.
Step 1: Arrive in Chile
- Fly into Santiago (SLC)
Step 2: Arrive In Puerto Natales (PNT)
Puerto Natales is the closest town to Torres del Paine and the base to do the W trek. You have two options for getting there:
- Option 1: Santiago (SLC) to Puerto Natales (PNT):
- Take about a ~3.5-hour flight right into Puerto Natales (these flights are limited and can be expensive, but save you time)
- Option 2: Santiago (SLC) to Punta Arenas (PUQ) to Puerto Natales:
- Take a ~3.5-hour flight from Santiago to Punta Arenas, then take a ~3-hour bus to Puerto Natales. (This route is more common since flights to Punta Arenas are more frequent and often cheaper.)
Step 3: Enter/Depart Torres del Paine National Park
Getting to and from Torres del Paine involves a mix of buses and a boat.
- Book the buses to/from Torres Del Paine with Bus-Sur.
- Book the catamaran to/from Pudeto/Paine Grande with Catamaran Lake Pehoe.
From Puerto Natales To Torres Del Paine
From Puerto Natales, buses run daily to Torres del Paine National Park. Where you get off depends on whether you are hiking east to west or west to east.
- East to West Start (Towers first)
- Bus from Puerto Natales to Laguna Amarga Entrance (~2 hours)
- Shuttle bus from Laguna Amarga → Central (your starting point)
- West to East Start (Glacier Grey first)
- Bus from Puerto Natales → Pudeto (~2.5 hours)
- Catamaran from Pudeto → Paine Grande (30 minutes, your starting point)
From Torres Del Paine To Puerto Natales
Your exit also depends on your W trek direction:
- East to West (finishing at Paine Grande):
- Hike to Paine Grande → Catamaran to Pudeto → Bus to Puerto Natales
- Hike to Paine Grande → Catamaran to Pudeto → Bus to Puerto Natales
- West to East (finishing at Central/Towers):
- Hike down from Central → Shuttle to Laguna Amarga → Bus to Puerto Natales
Example Transportation Flows
East to West (Central to Paine Grande)
- Fly Santiago → Puerto Natales (or Santiago → Punta Arenas → Bus to Puerto Natales) and overnight in Puerto Natales
- Morning bus Puerto Natales → Laguna Amarga → Shuttle to Central
- Start hike at Central → hike west across the W-trek
- Finish at Paine Grande → Catamaran to Pudeto → Bus back to Puerto Natales
West to East (Paine Grande → Central)
- Fly Santiago → Puerto Natales (or Santiago → Punta Arenas → Bus to Puerto Natales) and overnight in Puerto Natales
- Morning bus Puerto Natales → Pudeto → Catamaran to Paine Grande
- Start hike at Paine Grande → hike east across the W-trek
- Finish at Central → Shuttle to Laguna Amarga → Bus back to Puerto Natales
Step 4: Purchase Your Torres del Paine Park Entrance Ticket
In order to do the W trek, you will need an entrance ticket to Torres del Paine National Park. Tickets are required for all visitors, whether you are hiking the W Trek or just visiting for a day.
How To Buy Your Ticket
Purchase your ticket online here.
You will receive a PDF receipt, which you must show at the park entrance, so make sure to print a copy and have it saved on your phone.
Step 5: Create Your Packing List For The W Trek
The packing list is also one of the hardest parts about planning for your W Trek hike, as the weather in Patagonia is notorious for being unpredictable. Be prepared for sun, rain, snow, and strong winds all in the same day. Layers are your best friend!
Gear:
- Backpack (40–60L)
- Backpack rain cover
- Camping gear (if camping): Tent, sleeping bag, sleeping pad, pillow
- Trekking poles (can also rent these in Puerto Natales)
- Headlamp
Clothing:
- Hiking boots (waterproof and broken in)
- Hiking socks
- Insulated Puffer Jacket/Fleece
- Rain Jacket
- Waterproof hiking pants
- Base layers
- Mid layers
- Warm sleepwear
- Warm hat
- Warm gloves
- Buff/neck gaitor
- Sun hat
- Sunglasses
Toiletries:
- Toothbrush & Toothpaste
- Shampoo, Conditioner, & Body Wash
- Deodorant
- Face Cleanser & Moisturizer
- Body Lotion
- Suncreen
- SPF Lip Balm
- Hairbrush/Comb & Hair Ties
- Clensing Body Wipes
Other:
- Snacks
- Water bottle (rivers in Patagonia are safe to drink from)
- Electrolytes
- First-aid kit
- Power bank
- Quick-dry towel
- Dry Bag
Hiking the W Trek in Torres del Paine is one of the best things to do in Patagonia! I know firsthand that planning can feel intimidating at first, but I hope this breakdown makes it manageable.
If all of this still feels overwhelming, I am happy to help! Reach out via email with any questions you might have with planning your W trek in Patagonia, or check out my custom itineraries, where I can map out exactly what your W trek trip would look like, so you know exactly what to book.
So, follow this exact guide to get ready for an epic experience hiking the W trek in Patagonia! I can’t wait to hear about your trip!
Follow for more on social media and email me with any questions!
2 responses to “W Trek Patagonia: Complete Guide to Planning Your Torres del Paine Hike”
[…] on going on the W-Trek? I break this entire process down step-by-step in my detailed W-Trek planning guide […]
[…] have a full blog post on how to plan your W-Trek Hike here, so check that out for more details OR I have a complete Pagatonia Hiking Itinerary you can check […]